Showing posts with label pebbles. Show all posts

Sunday, 18 October 2015

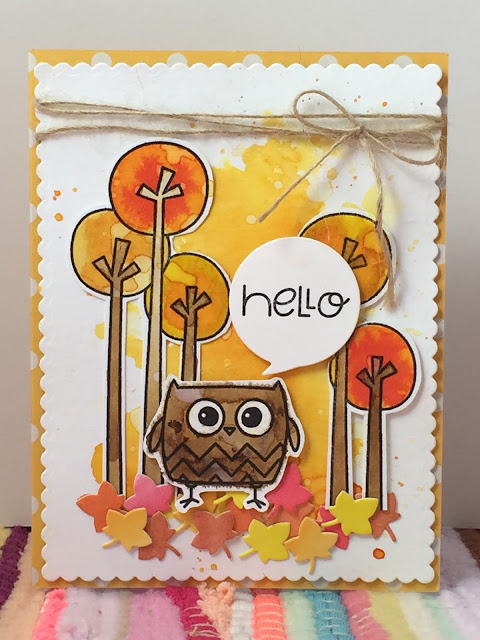
Hello Autumn Card

Hi Everyone,

Unfortunately I've not been well this week but, since I'm feeling a bit better, I decided to cheer myself up by entering the Paper Smooches Sparks October Picture Perfect Challenge. The picture had lots of autumn colours and leaves for inspiration and this is what I created. Hope you like it!:


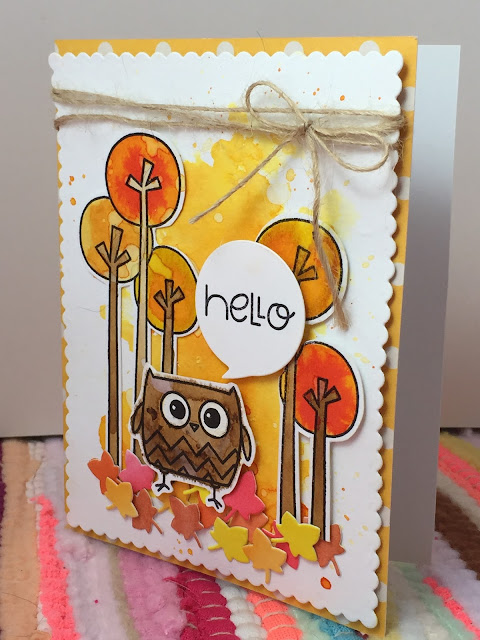
I started off with a yellow polka-dot note card from Pebbles as my card base. Next I die cut a piece of Ranger watercolour cardstock with the scalloped rectangle die from Mama Elephants Femme Frames dies. I used Distress inks in Spiced Marmalade and Mustard Seed to create a watercolour background for my woodland scene.


Next I stamped the tree images from the Spring Groves stamp set and the owl image from the Spookalicious stamp set, both from Paper Smooches, onto more watercolour cardstock. I used Ranger Black Tie die ink - I'm so impressed with this ink. It gives a crisp black image and is completed waterproof (I found my Memento Tuxedo black ink bleeds with water). I also stamped the hello sentiment from Paper Smooches Gently Seasoned stamp set with the same ink and die cut it with a Paper Smooches Wordbubble Die. Next I used more disress inks in Vintage Photo, Festive Berries, Spiced Marmalade and Mustard Seed to colour the trees and owl. I was initially a little disapointed with the colour bleeding outside the lines of the owl but then I decided it makes him look extra cute and fluffy. 


Next I watercoloured more cardstock in various colours and die cut leaves with one of the Papersmooches Seasonal Trees Dies. I adhered everything to my card with glue dots and foam squares for dimension and finished with hemp twine and a bow.

If you want to buy any of the Paper Smooches stamps and dies I used for this project, or anything else from this awesome company, then clicking on the image below will take you to their store. Happy Crafting!

Monday, 12 October 2015

You Are Spooktacular Card

Hello again,

So this is my final post of the weekend - I've had a great time beavering away in my craft room and created some projects I'm really proud of. Anyway, I think now that I've had my crafty splurge I'll aim to settle back into a one-two posts a week situation - otherwise my friends and family might start to forget what I look like.

The following card was made for the Lawnscaping challenge No. 115: Sentiments. I opted to use the halloween themed Spooktacular stamp set from Lawn Fawn as the basis of my design. In reality, Halloween isn't as big an event in the UK as it is in the US, but I really like this stamp set and I was in a creepy mood after finding, what can only be described as a monster of a spider, in my bath this morning!


I've done alot of CAS cards this weekend and I decided to do something more colourful today. I started off with a purple polkadot note card from Pebbles. I decided I wanted to diecut a moon and stars into the cardstock which required a little extra imagination as I don't have any moon-shaped dies. I created the shape by using two circle dies, one slightly smaller than the other, and partically die cutting them. I then used a tiny star die from a My Favourite Things die set called Hip Clips. Unfortunately the stars in this set are in sets of threes so I had to cut one free. I should probably say at this point that yes, it is possible to cut through the solid parts of a die using wire cutters, but also you shoud be sure to shield your eyes as the resulting tiny flying peices of metal could probably cause some serious harm - I'll admit this was not one of my most sensible moments!

So, having narrowly escaped death, or at least blindness, I added some silver glitter paper behind the night sky die cuts to add shimmer. Next I die cut some pieces of coloured card using the largest of the Small Stitched Rectangles from Lawn Fawn. I used two shades of green cardstock, Mossy Meadow and Old Olive, both from Stampin' Up. I then used the Lawn Fawn Grassy Border die to create overgrown grass for the foreground and two of the Mama Elephant Landscape Trio dies to create the hills for background. I also cut a peice of vellum from my stash using one of the the Lawn Fawn Puffy Cloud border dies to make some spooky mist/clouds . Next I used the Picket Fence Border die, also from Lawn Fawn and some Baked Brown Sugar cardstock from Stampin' Up to create my rickety old fence. I snipped into the fence to make it look old and broken and set it at a slight angle on the card.


I stamped the pumpkin, gravestone and ghost images from the Spooktacular stamp set onto Neenah Solar White cardstock using Memento Tuxedo Black ink. I coloured them with copic markers and fussy cut them. I adhered the cardstock layers and images to my card using tape runner and foam pads.


Since the theme is sentiments, I made sure mine was front and centre by stamping it into a speech bubble die cut made using one of the Word Bubble dies from Paper Smooches. I adhered it to the card with foam squares for extra dimension. I completed my acrd by adding a couple of 4mm and 6mm Sparkling Clear sequins from Pretty Pink Posh both to draw more attention to the sentiment and to draw together the sparkly background and the matte foreground. And that was it - job done.

To join in with this challenge yourself, or to checkout the other entries and design team inspiration, click on the image below to go to the the corresponding Lawnscaping Challenges blog post. Happy crafting everyone xx:


Sunday, 11 October 2015

Eternal Love Card

Hello again,

Well now my craft room is back in action there's no stopping me when it comes to making cards. I made this halloween-themed love note for the Paper Smooches Sparks Anything Goes Challenge for October and I think it would be perfect for any Twilight fan. PS Sparks made a special announcement on their blog this week that their weekly challenges will be coming to an end at the end of the month and, while I'm sad to see them go, I'm excited for the new monthly challenges coming up!

And now to the card. I used the vampire and bat images from the the Spookalicious stamp set from Paper Smooches. I also used the Eternal Love sentiment from the same set. I used a grey polka dot notecard from Pebbles as my card base. I then adhered a peice of Ranger Watercolor Paper onto which I die cut with a stitched frame from the Mama Elephant Femme Frames set. I used Zig Clean Color Markers in Black and Carmine Red and a waterbrush to create a creepy watercolour background.


I stamped the sentiment and bat images onto the Watercolor Paper with Versafine Onyx Black ink. I added glossy accents to one of the bats and to the heart on the sentiment for extra visual interest.


I stamped the main vampire image onto Neenah Solar White cardstock with Memento Tuxedo Black Ink. I coloured the image with copic markers and fussy cut it. Once it was adhered to the card with foam tape I used Wink of Stella to add sparkle to the cape and added a layer of glossy accents for extra shine. I also added glossy accents to his hair to create the look of a slicked-back do.


I completed my card by adding black and gold stars from Studio Calico to help lead the eye from the main image to the sentiment. Hope you like it and please do comment below as I love to hear from you all xx

P.S. If you click on the icon below it will take you to the Paper Smooches store where you can pick up all their awesome stamps and dies:


Tuesday, 21 October 2014

Read Me Tag

Hi guys,

So I have something a little different to show you this time. I made a bookmark tag for the AEIHeartU Tags Challenge using the Avery Elle Alice & Friends Stamp set. Hope you like it!


I started by die cutting a peice of white card stock and a peice of patterned paper, from the Pebbles Garden Party 6x6 paper pad, using one of the Paper Smooches book mark dies. I adhered these together. I stamped the white rabbit and Alice designs from the Avery Elle Alice and Friends stamp set onto a variety of patterned paper, using Memento Tuxedo Black ink. I then fussy cut each of the layers and paper peiced them. I added rosy cheeks with Spectrum Noir markers. I also used the scrolled banner and letters from the stamp set to create my 'Read Me' sentiment. I stamped this using Versafine in and fussy cut the image.

Next I created bunting using pink bakers twine and more patterened paper from the Garden Party paper pad, punched using my Stampin' Up banner punch. I added more twine and and ribbon to the top of the tag. I completed my tag with Aquamarine, Pink Blush and Sparkling Clear sequins from Pretty Pink Posh.


Clicking on the link below will take you to the challenge post so you can enter to. You can also see all the fab DT inspiration:


Wednesday, 15 October 2014

Let's Have a Party Card


Hi Everyone,

Well I'm so glad to be back to making cards after a pretty rubbish couple of weeks, with exams and then getting sick - like I said, rubbish! So I'm back and starting things off with this cute birthday card made for the Lawnscaping Patterned Paper Challenge. I used stamps from the Lawn Fawn Monster Mash stamp set as well as lots of bright patterned paper from the American Crafts #Summer 6x6 paper pad:


I used a Pebbles blue polka-dot notecard as the base for my card. Onto this I layered a scalloped rectangle of white card stock, cut using one of the Mama Elephant Femme Frames dies. I then layered a  piece of woodgrain paper from the My Minds Eye Necessities Wood 6x6 paper pad. I die cut a stitched rectangle of this using the largest shape from the Lawn Fawn Small Stitched Rectangles set. I used strips of washi tape to add interest to the background. I used a red woodgrain washi from Freckled Fawn and a yellow striped washi from my stash.


I stamped each of the monster images from the Lawn Fawn Monster Mash stamp set onto various papers from the American Crafts #Summer 6x6 paper pad. I used Memento Tuxedo Black ink to stamps my images. I then fussy cut them and adhered them to my card with foam pads. I die cut the balloons using a Paper Smooches die and stamped letters from the Lawn Fawn Claire's ABCs set to spell out party. I adhered the baloons to my card with foam tape. I used Lawn Fawn Natural Twine for the balloon strings.

The red flag in the top left corner is cut from a scrap of patterned paper. I stamped the "let's have a" sentiment from a selection of words from the Lawn Fawn Cozy Christmas stamp set.


Click on the image below to go straight to the Lawnscaping Challenge post with all the great entries and inspiration from their amazing design team:


Sunday, 14 September 2014

You Melt My Heart Card

Hi Guys,

Hope you like my latest card which I made for the Moxie Fab World Foxy Foxes Challenge. I really enjoyed creating textured fur for my little foxes with coloured pencils. The sequin 'snow' was lots of fun to create also.


I used a Pebbles polka-dot note card for the base of my card. Next I used a piece of Neenah Solar White Cardstock and Peacock Feathers Distress Ink to create a background. First I create a wash of ink and then I splashed water over the top to create a pattern. I then adhered the cardstock to the note-card.

Next I selected a piece of patterned paper from the Fancy Pants Nautical 6x6 paper pad. I then stamped the tree images from the Lawn Fawn Joy to the Woods stamp set directly onto it using Stampin' Up Crumb Cake Ink. I then fussy cut the trees and adhered them to the card using foam tape. I stamped the sentiment from Lawn Fawn's Here's The Scoop stamp set in Versafine Ink.


The two fox images are from the Joy to the Woods and Critters in the Woods stamp sets from Lawn Fawn. First I stamped them onto some more Neenah Cardstock in Hero Arts Soft Vanilla Ink. I wanted to create a textured look to give the impression of fur so I used my Spectrum Noir coloured pencils to colour my images. I then fussy cut them and adhered them to my card with foam tape. The speech bubble were die-cut using the Polaroid Fun die from Mama Elephant. I then stamped the heart image from Lawn Fawn's Hello Baby stamp set in Calypso Coral Stampin' Up ink.

I completed my card using sequins to create the the look of snow. I used 6mm and 4mm Sparkling Clear and 6mm Snow sequins from Pretty Pink Posh. I also used several Snow-flake shaped sequins from the Neat and Tangled Winter Wonderland Sequin Mix.


Clicking on the link below will take you to the Moxie Fab World Blog for the latest challenge and lots of great inspiration:


Sunday, 7 September 2014

You're My Universe Card

Hello everyone,

Well after a very busy and, at times, quite painful week at work, I was definately ready for some crafty time to take my mind off things. I enjoyed makng the background for my space card last week i decided to have another go, this time for a valentines or anniversary card. I just love these cute Aliens from the Paper Smooches Space Cadet stamp set and I really enjoyed using them to create this card for the Paper Smooches Sparks Anything Goes Challenge. Please do let me know what you think xx


I used a grey polka dot notecard from Pebbles as my card base and adhered a piece of Ranger Watercolour paper to the front, which I die cut using one of the stitched rectangles from the new Lawn Fawn die set. I created the background galaxy effect in the same way as last weeks card, this time using Spun Sugar and Milled Lavendar Distress Inks for a more suble coloured effect.

I used a piece of gold glitter paper from the DCWV Glitz Pastel 6x6 paper pad as the base for my aliens and astronaut to stand and wave on. I stamped several images from the Paper Smooches Space Cadet set onto Neenah Solar White cardstock using Black Licorice Hydrid Ink from My Favourite Things. I coloured the images with Spectrum Noir Pencils, paper stubs and blending solution. I then fussy cut them and adhered them to the card with foam tape to create dimension. I used speech bubbles and hearts stamped in Spun Sugar Distress Ink for extra cuteness.


I used my Fiskars 2 inch Circle punch and some paper from the My Minds Eye Jubilee 6x6 paper pad to create the planet. The sentiment banner was made from more Solar White cardstock, black Licorice ink and a sentiment stamp from the Space Cadet set. I finished the card with Sparking Clear and Pink Peonies sequins from Pretty Pink Posh, green and yellow sequins from the Neat and Tangled Spring mix and a gold Sequin from my stash.

Click on the image below to see all the other great entries for this weeks challenge:


Clicking on the image below will take you to the Paper Smooches Shop where you can buy all their amazing stamps and dies, including the Space Cadet stamp set:


Monday, 25 August 2014

You Make Me a Happy Camper Card


Hi guys,

It's been a busy crafty bank holiday weekend for me and this is the last of the cards I've been making. I made this card for the Avery Elle AEIHeartU Challenge No. 14  and Paper Crafting Challenge No. 17  sequin challenges. I don't make many cards with a lot of white space so this is something a bit different for me. I used paper piecing and a little stamping to make this card using the Avery Elle Happy Camper stamp set and one of my new favourite 6x6 paper pads from the Crate Paper Notes & Things collection - enjoy!


I used a grey polka-dot notecard from Pebbles for my card base. I then die cut a scalloped rectangle from Neenah Solar White Cardstock using one of the Mama Elephant Femme Frames dies. 

Next I used the lake stamp from teh Avery Elle Happy Camper stamp set and stamped it nto the reverse of the cardstock rectangle using Hero Arts Soft Vanilla Shadow Ink. I used a Fiskars craft knife to cut the outline of the image from the cardstock to use as the aperture for the shaker element of my card. I stamped the cloud images directly onto the white cardstock using Pool Party ink from Stampin' Up. I also stamped the tree images using Pear Pizzaz ink, also from Stampin' Up. 

Next I stamped the mountains, trees, canoe and fox images onto the reverse side of several patterened papers from the Notes & Things 6x6 paper pad from Crate paper. Again I used Hero Arts Soft Vanilla ink. I then fussy cut the images - believe me this was pretty fiddly and time-consuming! - and adhered the to the front of my card using small pieces of foam tape. 

I stamped the sentiment from the Happy Camper Stamp set onto the front of my card using Hero Arts Charcoal Midtone Ink - this gave a little softer effect than black ink.

I adhered acetate behind the lake aperture and carefully lined the edge with foam tape. I then placed sequins where I wanted my lake to be and glued the front of my card to the card base. I used 4mm Sparkling Clear sequins and 6mm Aquamarine sequins from Pretty Pink Posh, as well as a few others from my stash. Finaly I completed my card by adhereing a few more sequins to the front. 


Clicking on the badge below will take you to the challenge post and the rest of the great entries for the 14th Avery Elle challenge:


Saturday, 16 August 2014

Cheer Up Grumpasaurus Card

Hey Guys,

I made this card for my Vicar who has been a bit sad recently. I really love the sentiment from the Paper Smooches Cuteasaurus stamp set and I thought it would be perfect for this card. I wanted to enter the card into this weeks Paper Smooches Sparks Challenge and the design is inspired by their photo.


The card base is a Pebbles notecard from their Garden Party Collection. I then die cut a piece of vellum using the scalloped edge frame from the Mama Elephant Femme Frames set. Next I used the inner frame from the same set to create a stitched rectangle of Neenah Solar White cradstock. I stamped the Hero Arts Galaxy wood block stamp with Stampin' Up Smokey Slate ink onto this. I then used a piece of woodgrain paper from the Dear Lizzy Daydreamer 6x6 paper pad and die cut it into to a speech bubble using the Mama Elephant Speech Trio dies. I die cut some tiny heart shaped windows into it using  Simon Says Stamp Mini Heart Set Craft dies and stamped the sentiment from the Paper Smooches Cuteasaurus stamp set in Hero Arts Charcoal ink. The dinosaur images are from the same Paper Smooches set as the sentiment and i stamped and paperpieced them using more 6x6 paper from the Dear Lizzy Daydreamer collection. The flowers that the dino on the right is holding are tiny images from the the Mama Elephant Honey Bunny stamp set which I painstakingly stamped and cut from scraps of pink patterned paper - good job I enjoy fussy cutting! I adered each of the layers with foam tape to create dimension and completed the card with twine from my stash and 4mm and 6mm Sparkling Clear sequins from Pretty Pink Posh.


I tried to take as much inspiration from the Paper Smooches photo as possible. The colour scheme of pale pink, pale aqua, white and grey is taken from it. I also used pink flowers and woodgrain inspiried by the wooden paintbrushes. The sparkling clear sequins were inspired by the glass jars and bottles.


Below is the photo that inspired my card. Click on it to go straight to the challenge post on the Paper Smooches Sparks website:

 August challenge

Clicking on the Paper Smooches badge below will take you straight to their website where you can buy all their awesome stamps and dies:

Friday, 18 July 2014

Savanna Pop-Up Birthday Card

This has to be my favourite card I've made so far. I used a yellow chevron card blank from Pebbles. I wanted to keep the front quite simple so I could really go to town on the pop-up on the inside. I used a lion stamp from Lawn Fawn's Critters on the Savanna and backed it on a stitched circle of white card die-cut using the Stitched Party Banners die, also from Lawn Fawn. The sentiment is also from Critters on the Savanna and I completed the front of the card using a few sequins from my stash.


I had so much fun making the centre of this card. I used patterned paper from #Summer by American Crafts (I also used a couple of scraps from other collections but I'm afraid I can't recall where they came from). I created three layers of scenery to act as the main pop-up mechanicm, using the Mama Elephant Landscape Trio and Lawn Fawn Grassy Border dies. The trees, animals, birds and rocks all come from the Lawn Fawn Critters on the Savanna stamp set. They were stamped with Momento Tuxedo Black ink and coloured with Spectrum Noir pencils and blending fluid. I added white accents with a Uniball white gel pen and fussy cut them. I created the bunting in the background using a Stampin' Up banner punch and green bakers twine from the Dovecraft Riverbank Revels collection. The 'birthday wishes' sentiemnt was stamped and die cut using the Wplus9 Basic Banner set and Hero Arts Green Hills ink. I completed the card using sequins from my stash.


Wednesday, 21 May 2014

New Home Card

I made this card for my brother and sister-in-law when they moved. The card base is by Pebbles - I really love the aqua chevrons. The stamp set is Bitty Bungalows by Paper Smooches. I stamped the images with Momento Tuxedo Black ink and coloured them with alcohol markers. I fussy cut them and popped them up on gue dots to add dimension. The sentiment is from an old Mollie Bloom set (I can't recall the name I'm afraid) and I stamped it with Hero Arts Soft Pool and Stampin' Up Real Red inks. The wood veneer geotag is from Studio Calico and I coloured the central heart with matching Real Red ink and used glossy accents to add shine. The heart images are from the Happy Feast stamp set from Lawn Fawn. The piece of rafia took me the longest to decide on - I must have tried every peice of twine and ribbon in my stash before I finally settled on this one!